Gatsby and Netlify CMS for Markdown
In this section, we use NetlifyCMS to manage the blog content using markdown. You can visit the netlifyCMS official website on the below page.

As for now, We can only add the add blog content manually from the filesystem. Netlify CMS is a way to manage content on the server instead of managing the content from the VScode editor. To use NetlifyCMS in the project, we can execute the below command in the terminal to download the required npm package for Netlify CMS as below:
npm install --save netlify-cms-app gatsby-plugin-netlify-cmsAfter you install the required package for netlifyCMS... In the gatsby-config.js, we need to add the gatsby-plugin-netlify-cms package in the plugins array as below:
plugins: [
	`gatsby-plugin-netlify-cms`
]
Next, create config.yml file in the below location:
/static/admin/config.yml
/static
└── /admin
		└── config.yml
In the config.yml file, we can define the behavior for NetlifyCMS. For example,
- Define the custom input fields for relative document
- What commit message is used when data is published and Git branch where the data lives
- Create the collections of different documents
In the config.yml, we can write the code as below:
backend:
  name: github
  repo: taimoorsattar7/gatsby-blog-netlify-cms
  branch: master
  commit_messages:
    create: "Create {{collection}} “{{slug}}”"
    update: "Update {{collection}} “{{slug}}”"
    delete: "Delete {{collection}} “{{slug}}”"
    uploadMedia: "[skip ci] Upload “{{path}}”"
    deleteMedia: "[skip ci] Delete “{{path}}”"

media_folder: static/img
public_folder: /img
publish_mode: editorial_workflow

collections:
  - name: "blog"
    label: "Blog"
    folder: "content/blog"
    create: true
    slug: "index"
    author: "{{author}}"
    media_folder: ""
    public_folder: ""
    path: "{{title}}/index"
    editor:
      preview: false
    fields:
      - { name: title, label: Title }
      - { label: "Description", name: "description", widget: "string" }
      - { name: date, label: Date, widget: date }
      - { name: body, label: Body, widget: markdown }
      - {
          label: Featured Image,
          name: featuredimage,
          widget: image,
          required: false,
        }
Let's breakdown the code in the config.yml.
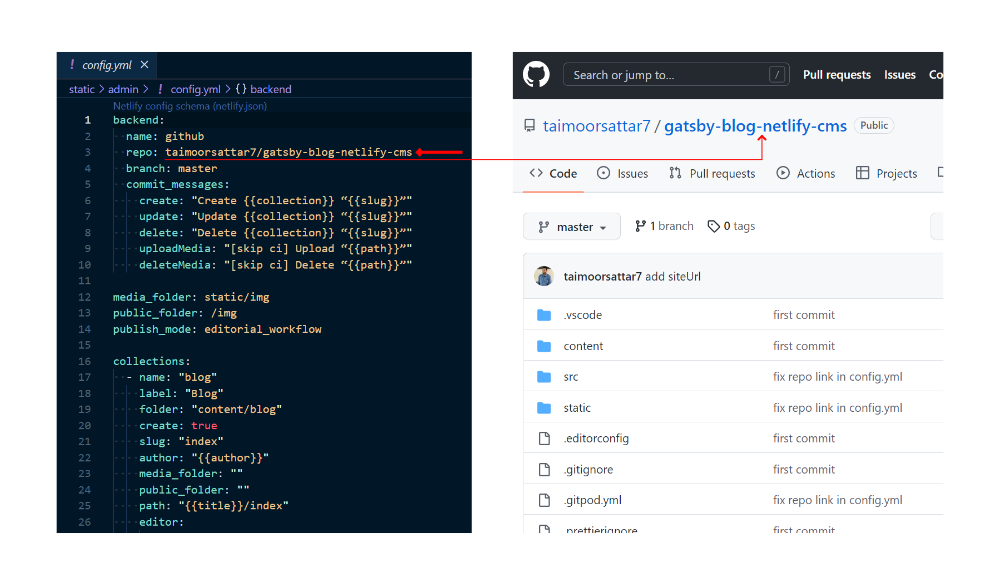
In the config.yml, we mentioned the name of the Github repo from where the NetlifyCMS fetch the blog post data.

Your Github repo may be different from mine.
Further, you can customize the commit message when publishing the blog post content using NetlifyCMS. For that, we can add below lines of code in the config.yml.
commit_messages:
    create: "Create {{collection}} “{{slug}}”"
    update: "Update {{collection}} “{{slug}}”"
    delete: "Delete {{collection}} “{{slug}}”"
    uploadMedia: "[skip ci] Upload “{{path}}”"
    deleteMedia: "[skip ci] Delete “{{path}}”"
Next, we need to map the respective fields of markdown (blog post) in the NetlifyCMS. For that, we can write the code in config.yml as below

Let's Try NetlifyCMS
Before trying NetlifyCMS, we must deploy the latest changes on Github. The netlifyCMS fetch the blog post content from the Github repository, not from the local filesystem.
To get started, you first need to create a Github repository for your respective project. I'll not go through the process of creating a Github repo as I've already covered, you can follow along in the below link.
Push your code on GitHub 👥To push your code on the Github repo, you can execute the below three (3) commands in the terminal.
git add -A
git commit -m "initial commit"
git push origin master
After executing the above commands, your code is live on Github.
For this project, I have already created a Github repo where you can find the complete code.
If you want to work with my code instead of yours, you can fork the repo.

Next, you want to deploy your code on Netlify. I'll not go through the process of deploying your code on Netlify as I've already covered, you can follow along in the below link.
Deploy code on Netlify 🌐After you successfully deploy your code on Netlify, you'll receive a public URL where you can access your website

As shown in the above image, my netlify deploy URL is https://gatsby-blog-netlifycms.netlify.app. But your's will be different.
To access the NetlifyCMS admin, you can go to /admin slug as shown in the below image.

But, we receive an error when we login...
It's because you have not reauthorized your website with GitHub. For this, you need to create an OAuth app on the GitHub developer setting.

You can read more about adding OAuth provider tokens on your site in the Netlify official Docs. To set up OAuth on our website, you can follow the steps below
- Visit the GitHub developer setting page
- Click the New OAuth App button

- Register a new OAuth application by filling the required field as described below.

In the Authorization callback URL, paste this URL: https://api.netlify.com/auth/done
- After registration OAuth application, it will generate the Client ID and Client Secret.

Next, you need to manually paste the Client and secrets ID into the Netlify access control.

Place the client and secret ID as shown in the below image.

After that, visit the NetlifyCMS with the /admin slug of your website. You will see the list of blog posts available as shown below.

To create a new blog, click on the New Blog button. Write your blog post in the NetlifyCMS and hit publish to post your blog.

After you publish your blog post, NetlifyCMS commits the message to the respective Github repo. After that, Netlify listens to the commit message and builds the project again. The build process takes some time and after the build process completes, your blog post lives on the website.
Note: Whenever you publish (commit) a new post, your local repository becomes outdated. Now you can't commit the changes to GitHub from your local project. To ensure commit changes, you need to pull the recent changes on your local project.
To pull the recent commit, you can type the below command in the bash terminal.
git pull origin master