How to create an HTML form


The HTML form is used to collect user input data. We can validate the input data from the client side (JavaScript) before sending it to the server.
To define the HTML form, we can write the code as below:
<form>
 <!-- Here goes your input elements -->
 <fieldset>
 <input type="text" id="fname" name="fname" />
 <input type="submit" value="Submit" />
 </fieldset>
</form>
The
<fieldset>HTML element is used to group elements of the form.
The above HTML form has a text input and submit button as shown below.

Semantic HTML form?
When creating an HTML form, element input should be semantic. By doing so, the browser can capture the best possible experience for the user.
In HTML forms, we can specify the types and attributes of the input.
- Input Type
- Input attributes
Input Type tells the browser what type of input this is. Let’s consider a scenario.
For example.
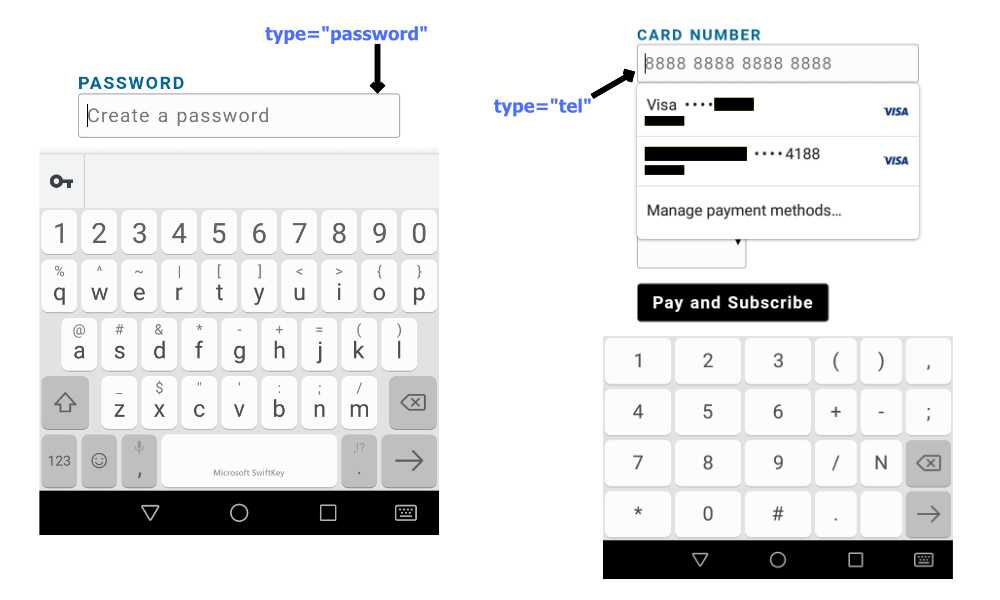
Use the attribute type=“tel” in the input if you want to ask users about their telephone. This attribute can also be used to collect credit card numbers from users. It is incorrect to use input type instead of type=“tel”, as both contain numeric data. Input with type=“password” that contains alphabetic and numeric characters, hidden in dots.
The telephone contains numbers only not alphabets. In the image below, the type=“tel” indicates a numeric keyboard. In the case of the wrong input type, the user has to switch to the numeric keyboard with one more step.
The following are the HTML input types:
type="button"type="checkbox"type="color"<input type="date"><input type="datetime-local"><input type="email"><input type="file"><input type="hidden"><input type="image"><input type="month"><input type="number"><input type="password"><input type="radio"><input type="range"><input type="reset"><input type="search"><input type="submit"><input type="tel"><input type="text"><input type="time"><input type="url"><input type="week">
The following table lists some of the attributes that can be used in forms.
| Attributes | Description |
|---|---|
readonly |
The read-only attribute does not allow users to enter data and cannot be edited. |
required |
The required attributes in HTML forms make the respective input mandatory before it’s submitted. |
disabled |
This is useful in a scenario when the form is submitted and we don’t want it to respond to click events while the form is being processed. |
autofocus |
The autofocus attributes focus on the input element when the page loads. |
step |
The step attribute increments the input of the type number with the number of steps provided. |
pattern |
The pattern attribute checks the input against the pattern defined. |
value |
The value attribute defines the value of an input. |
placeholder |
The placeholder attribute gives a general overview of what we need to write in the input element. The placeholder attribute value text appears in the input field but disappears when clicked. |
checked |
The checked attribute is the Boolean attribute, used in the checkbox and radio input type. checked attribute by default selects the field of input. |
maxlength |
The maxlength attributes specify the maximum character length for the HTML input element. |
autocomplete |
The autocomplete attribute provides automated assistance to fill out the form field. |
aria-invalid |
aria-invalid indicates that the value entered into an input field does not comply with the format expected by the application. |
As shown below, we can also define attributes in the <form> HTML element.
| Attributes | Description |
|---|---|
| action | When the form is submitted, the form-data are sent to the specific url, or server for further processing. |
| method | This defines how your data (information) is sent to the URL, or server when the form is submitted. For example. GET, POST. |
| name | A way of referencing the form-data when it’s sent to the server. We can assign specific name to the element of form. If multiple inputs have the same “name” value, these inputs will be grouped together on the form itself. |
| novalidate | It is a boolean attribute that indicates that form-data (input) should not be validated when submitted. |
Get Started
In this section, we create an HTML form for Jobs Applications, validate the form fields, and submit the form. Here are some of the features we plan to implement:
- Accept user input with the appropriate type
- Perform Regex operations on input values
- Preview the uploaded image.
- Submit form data.
The full source code can be found at the following GitHub link:
🔗 github/taimoorsattar7/html-form-netlify
We will cover form submission using Netlify forms in the upcoming blogs.
To get started, first, we create a project folder, my-app, and organize the files as follows:
my-app
└── css
    └──style.css
    └── index.html
Below we’ve listed the fields that are used for the application:
form
├── input: firstName (type="text")
├── input: lastName (type="text")
├──input: email (type="email")
├── input: telephone (type="tel")
├── input: url (type="url")
├── textarea: message
├── input: avatar (type="file")
└── select: positions
In the index.html, we can create an HTML form with the field listed above.
<div class="container">
 <form onsubmit="return handleSubmit(event)"
 method="POST"
 id="myForm"
 class="form">

 <h1 class="headline">
 <b>Submit Jobs Application</b>
 </h1>

 <p>
        This is an example form that handle form submission on Netlify.
 </p>

 <div class="divider">
 <label for="firstName"

 >First Name</label>

 <input type="text"
 id="firstName"
 name="firstName"
 placeholder="First Name"
 required />
 <div>

 <div class="divider">
 <label for="lastName">Last Name</label>
 <input type="text"
 id="lastName"
 name="lastName"
 placeholder="Last Name"
 required>
 </div>

 <div class="divider">
 <label for="email">Email</label>
 <input type="email"
 id="email"
 name="email"
 placeholder="your@email.com"
 required />

 </div>

 <div class="divider">
 <label for="url">Portfolio (optional)</label>
 <input type="url"
 id="url"
 name="url"
 placeholder="https://taimoorsattar.com" />
 </div>


 <div class="divider">
 <label for="message">Type Your Message</label>
 <textarea name="message"
 id="message"
 cols="30"
 rows="10"
 spellcheck="true"
 placeholder="Type your message here"></textarea>
 </div>

 <div class="divider">
 <label for="avatar">Upload Your Photo</label>

 <input type="file"
 id="avatar"
 onchange="imagePreview(this)"
 name="avatar"
 accept="image/png, image/jpeg" />
 </div>

 <div class="divider">
 <label for="positions">Which position you are appling for?</label>

 <select name="positions"
 id="positions"
 onchange="showDiv(this)"
 >
 <option value="frontEnd">
            Front End Developer
 </option>

 <option value="designer">
            Designer
 </option>
 </select>
 </div>

 <div class="divider">
 <input id="btn"
 type="submit"
 onsubmit="return handleSubmit(event)"
 value="Submit" />
 </div>

 </form>
</div>
The above code display HTML form in the browser as below:
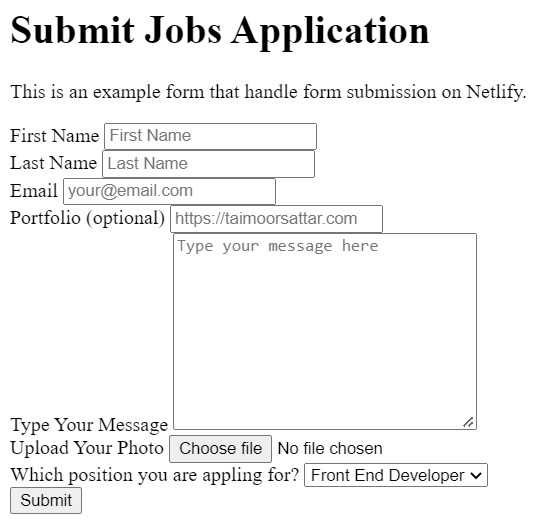
The above HTML form has no styling applied. You can learn about style HTML form on this page.
Add functionality to the HTML form
We can use JavaScript to add functionality to the HTML form. Using JavaScript, we are adding a few new functionalities to the form as below.
- Preview image on upload before submission
- Perform validation of HTML input using Regex
- Handle form submission
Preview image on upload
In index.html, we have the input field of type="file" as shown below.
<div class="postfield__file">
 <label for="avatar">Upload Your Photo</label>
 <img id="avatar" alt="avatar" />
 <input
 type="file"
 id="avatar"
 onchange="imagePreview(this)"
 name="avatar"
 accept="image/png, image/jpeg"
 />
</div>
When the page first load, the image link is broken as there is no source. Using JavaScript, we can hide the image from the page as below.
document.addEventListener("DOMContentLoaded", function (event) {
 document.querySelectorAll("img").forEach(function (img) {
 if (!img.src) {
      img.style.display = "none"
    }
  })
})
The above code in Javascript code, adds the event listener DOMContentLoaded which runs when the DOM loads. It selects all the <img> element from the DOM and hide the image if it has an empty source. You can read more about the DOM manipulation using JavaScript here.
When the user uploads the image file, imagePreview(this) function is called and the this parameter is passed. this in JavaScript return the instance of the HTML element which is calling the function. Using this, we get the reference of the uploaded image.
To preview the image, we use blob in javascript to generate the image URL with a random string. In javascript, we use the below code to generate Blob URL for the image and display it on the page.
function imagePreview(e) {
 const blob = new Blob([e.files[0]], { type: "image/jpeg" })
 const blobURL = URL.createObjectURL(blob)
  avatar.style.display = "block"
  avatar.src = blobURL
}
You can learn more about image preview on this page.
Perform validation of input using Regex
We can use Regex (Javascript) pattern to validate the input (values). We use regex to check whether our input data is valid or not.
In JavaScript, we define the regex pattern to confirm input as below.
// define the regex pattern to validate user input.
let pattern = {
 text: /^[a-z0-9\d\s\W]+$/i,
 email: /^([a-z\d\.-]+)@([a-z\d-]+)\.([a-z]{2,8})(\.[a-z]{2,8})?$/,
 url: /^(http:\/\/www\.|https:\/\/www\.|http:\/\/|https:\/\/)?[a-z0-9]+([\-\.]{1}[a-z0-9]+)*\.[a-z]{2,5}(:[0-9]{1,5})?(\/.*)?$/g,
 userName: /^[a-z][a-z0-9]{7,50}$/i,
 tags: /^[\a-z]+(?:,[\a-z]+){0,4}$/g,
 password: /^[\w@-]{8,20}$/,
 tel: /^\d{11}$/,
}
Using regex as define above, the following checks are applied when validating the form fields.
- text: include words + numeric
- email: similar to your@name.dev
- userName: (alphabets + numeric) from 7 and upto 50 character. It’s first character should be character.
- URL: Check is it valid URL
- password: (alphabets + numeric + special character) should be between 8-20 character
- telephone: numeric character cantains 11 digits
In JavaScript, we can test the form fields value against the respective regex pattern using the below function:
function valudateInput(type, value) {
 if (!pattern[type]) return true
 return pattern[type] ? pattern[type].test(value) : ""
}
The above function accepts two (2) parameter (type, value).
Handle form submission
When the form is submitted, the button should be unclickable due the process and clickable after the process has been completed. In JavaScript, we can use the disabled attribute to make buttons clickable and unclickable.
In JavaScript, we can reference of form field as below.
const errorMessage = document.getElementById("error-message")

const firstName = document.getElementById("firstName")
const lastName = document.getElementById("lastName")
const email = document.getElementById("email")
const telephone = document.getElementById("telephone")
const message = document.getElementById("message")
const avatar = document.getElementById("avatar")
const positions = document.getElementById("positions")

// Create input array of reference
let arrayInputs = [firstName, lastName, email, telephone, message]
When the form is submitted, we can use the above reference for form fields, validate the field’s value, and submit the form.
function handleSubmit(e) {
 // `e.preventdefault()` change the default behavior of form.
  e.preventDefault()
  errorMessage.innerText = ""

 // Disable the button during form submission
  button.disabled = true

 // You can also loop the arrayInputs for e varible
 // let inputs = Array.from(e.target);

 // Loop through Input arrays
 let isError = false
  arrayInputs.forEach(function (input) {
 // input.value, input.name, input.type
 if (!valudateInput(input.type, input.value)) {
      errorMessage.innerText = "Please Fill the inputs!!!"
      errorMessage.scrollIntoView()
 isError = true
    }
  })

  button.disabled = false

 if (!isError) {
    form.submit()
  } else {
 return false
  }
}
The above form submits the data when the button is clicked. But the user data is still not saved in the database. To learn more about form submission using Netlify form, you can follow this page.